
Introduction
There is a particular kind of frustration that happens in a physics lab when a student takes three readings of the same object and gets three noticeably different values. Sometimes it is the instrument. More often, it is the reading technique. The measurement is only as good as the person taking it — and taking it well is a learnable skill, not a talent.
This guide covers how to read the most common measuring instruments in a physics lab correctly, the general principles that apply across all of them and the practical habits that separate careless readings from trustworthy ones. Whether you are preparing for a Class 11 practical exam or trying to improve your actual lab technique, this is where to start.
Why Reading Technique Matters
Measurement is the backbone of experimental physics. Every law, every formula, every constant in your textbook was established through careful measurement. When your readings are unreliable, everything built on top of them — calculations, conclusions, error analysis — becomes unreliable too.
Poor reading technique introduces a specific kind of error called systematic error: a consistent bias that shifts every reading in the same direction by roughly the same amount. Unlike random errors, which scatter readings on both sides of the true value, systematic errors cannot be averaged away. They stay. They accumulate. They invalidate conclusions.
Good reading technique, on the other hand, minimizes both systematic errors (by following correct procedure) and random errors (by being consistent and attentive). It also ensures that the precision your instrument is capable of is actually captured in the reading — not wasted.
[Learn more about Top 5 Errors in Physics Measurements and How to Minimize Them]
General Principles That Apply to Every Instrument
Before covering individual instruments, it is worth establishing principles that apply universally. Follow these regardless of what you are measuring.
1. Check for Zero Error Before Every Use
Any instrument that has a zero point must be checked before taking readings. If the instrument does not read zero when the measured quantity is zero, every reading will be offset by the zero error — and you will not know it unless you checked.
Zero error can be positive (reads too high) or negative (reads too low). The correction formula is always:
\[ \text{Corrected Reading} = \text{Observed Reading} – \text{Zero Error} \]
A positive zero error is subtracted. A negative zero error, when subtracted, adds to the observed reading.
2. Know the Least Count of the Instrument
The least count tells you the smallest division the instrument can resolve. You cannot report a reading more precise than the least count. Reading beyond it is guesswork; reading to fewer places than the least count discards real information.
\[ \text{Least Count} = \text{Value of smallest division on the scale} \]
For instruments with auxiliary scales (like the Vernier caliper), the least count is calculated from the relation between the main and auxiliary scales.
[Learn more about Least Count of Vernier Caliper and Screw Gauge: Formula & Calculation]
3. Avoid Parallax Error
Parallax error occurs when your line of sight is not perpendicular to the scale at the point of reading. It causes the scale marking to appear shifted relative to the pointer or liquid level, giving a reading that is consistently too high or too low depending on the angle of view.
The fix is straightforward: position your eye so that it is directly level with the measurement point, with the line of sight perpendicular to the scale. For instruments with a mirror strip behind the scale (like many ammeters and voltmeters), align your eye so that the pointer and its reflection appear as one — that is the correct viewing angle.
4. Allow the Instrument to Stabilize
Many instruments need a moment to reach equilibrium before you record a reading. A thermometer placed into a liquid needs time to reach the temperature of the liquid. A spring balance needs to stop oscillating. A galvanometer needle needs to settle. Reading before stabilization gives a value that is neither the true equilibrium reading nor a reproducible one.
5. Record the Reading Immediately
Do not rely on memory. Read the instrument, write the value down, then move on. Memory introduces its own bias — you may unconsciously round toward an expected value or a previous reading.
6. Take Multiple Readings and Average Them
A single reading is never enough for reliable experimental work. Take at least three readings, ideally in slightly different conditions or positions and calculate the mean. This reduces the effect of random error significantly.
\[ \bar{x} = \frac{x_1 + x_2 + x_3 + \cdots + x_n}{n} \]
[Learn more about Absolute Error, Relative Error and Percentage Error: A Complete Guide]
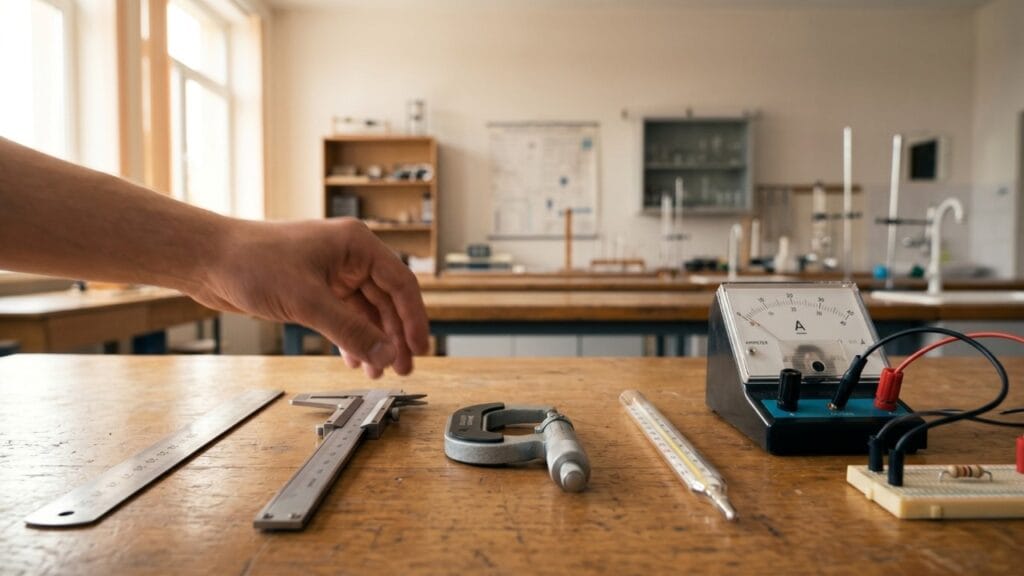
How to Read a Ruler or Metre Scale
A ruler is the simplest measuring instrument, but even here technique matters.
Correct method:
- Place the ruler flat against or alongside the object being measured. Avoid tilting it — a ruler held at an angle gives a reading longer than the true length (a common error called cosine error).
- Align the zero mark (not the end of the ruler, which may be worn) with one end of the object, or note the scale reading at that end.
- Read the scale at the other end with your eye directly above the scale mark. Do not view from an angle.
- Estimate one digit beyond the smallest division if possible — for a mm-graduated ruler, you can estimate to the nearest 0.5 mm with practice.
Common mistake: Placing the end of the ruler (not the zero mark) against the object. On worn or damaged rulers, the physical end and the zero mark are not the same point.
Least count: 1 mm for a standard millimetre-graduated ruler.

How to Read a Vernier Caliper
A Vernier caliper measures to 0.1 mm or 0.01 mm depending on its design. The reading process has three distinct steps that must be followed in order.
Step 1 — Read the main scale. Look at where the zero of the Vernier scale falls on the main scale. Note the last complete millimetre mark to the left of the Vernier zero. That is your main scale reading (MSR).
Step 2 — Read the Vernier scale. Scan along the Vernier scale and find the one division that aligns most precisely with any division on the main scale. The number of that Vernier division is your Vernier scale reading (VSR).
Step 3 — Calculate the total reading.
\[ \text{Total Reading} = \text{MSR} + (\text{VSR} \times \text{LC}) \]
Step 4 — Apply zero error correction if needed.
\[ \text{Corrected Reading} = \text{Total Reading} – \text{Zero Error} \]
Practical tips:
- Hold the caliper at eye level when reading — do not read it flat on the table looking down at an angle.
- Make sure the jaws are fully seated against the object and not tilted. A tilted jaw gives a reading larger than the true dimension.
- For measuring diameters, take readings at two or three positions along the object (and at two perpendicular directions at each position) to check for taper or out-of-roundness.
- The coinciding Vernier line should be the one that is most clearly aligned — do not force a coincidence that is not there. If two adjacent lines seem equally close, estimate between them.
How to Read a Screw Gauge
A screw gauge reads to 0.01 mm and requires careful attention to the sleeve reading — particularly whether the 0.5 mm graduation is visible or not.
Step 1 — Read the sleeve (main) scale. Look at the linear scale on the sleeve. Read the last complete millimetre mark visible to the left of the thimble edge. Then check whether the 0.5 mm graduation (halfway between the previous whole-mm mark and the next) is also visible. If it is, add 0.5 mm.
Step 2 — Read the thimble (circular) scale. Find the division on the circular scale that aligns with the horizontal reference line on the sleeve. Note that number.
Step 3 — Calculate the total reading.
\[ \text{Total Reading} = \text{Sleeve Reading} + (\text{Circular Scale Reading} \times \text{LC}) \]
Step 4 — Apply zero error correction.
Practical tips:
- Always use the ratchet stop to close the spindle, not the thimble directly. The ratchet ensures consistent, standardized pressure. Tightening with the thimble can compress soft materials and also introduces variability.
- Listen for the clicking sound of the ratchet — that is the signal that the correct pressure has been reached and you can read the scale.
- For small cylinders or wire, measure at several points along the length to detect non-uniformity.
- The most common reading error is missing the 0.5 mm graduation on the sleeve. Always check explicitly whether it is visible before recording the sleeve reading.
How to Read a Thermometer
A thermometer measures temperature, typically using mercury or alcohol column expansion in a calibrated glass tube.
Correct method:
- Ensure the thermometer bulb is fully immersed in the substance being measured, not just touching the surface.
- Wait for the column to stabilize before reading. For mercury thermometers in liquids, this typically takes 30 to 60 seconds. Do not remove the thermometer from the liquid before reading — the column will shift the moment it leaves the thermal environment.
- Read the scale with the thermometer held vertically and your eye level with the top of the liquid column. Reading from above or below introduces parallax.
- For mercury thermometers, read to the top of the meniscus. For alcohol (which tends to be coloured), also read to the top of the column.
Least count: Typically 0.5°C or 1°C for standard lab thermometers. Clinical thermometers typically read to 0.1°C.
Common mistake: Reading the thermometer after removing it from the liquid, or tilting it at an angle when reading. Both give inaccurate values.

How to Read an Ammeter and Voltmeter
Ammeters and voltmeters are pointer instruments with a curved scale. Reading them correctly requires care about scale selection, pointer position and parallax.
Step 1 — Select the correct range. Before connecting the instrument to a circuit, set the range higher than your expected measurement. Then reduce the range once you have a rough idea of the value. Using too high a range compresses the reading onto a few divisions and loses precision. Using too low a range can damage the instrument.
Step 2 — Read with no parallax. Most ammeters and voltmeters have a mirror strip behind the scale. When you view the pointer, look for its reflection in the mirror. Move your head until the pointer and its reflection appear as a single line — your line of sight is now perpendicular to the scale and parallax error is eliminated.
Step 3 — Read the correct scale. Many ammeters have multiple scales (for different ranges). Make sure you are reading the scale that corresponds to the range you selected. Reading the wrong scale is more common than it sounds, especially under exam conditions.
Step 4 — Estimate the last digit. Read the nearest major division, then count minor divisions to the pointer position. Estimate one further digit if the pointer falls between two minor divisions.
Least count: Depends on the instrument range and number of divisions. Always calculate it from the scale you are actually using.
\[ \text{LC of ammeter/voltmeter} = \frac{\text{Range of selected scale}}{\text{Number of divisions on that scale}} \]
How to Read a Spring Balance
A spring balance measures force (or weight) by the extension of a spring. It is simpler than the instruments above, but still has specific reading requirements.
- Hang the spring balance vertically from a fixed support. Never hold it at an angle when reading.
- Allow the pointer to settle completely before reading. Oscillations will damp out within a few seconds.
- Read at eye level, perpendicular to the scale.
- Check that the pointer reads zero before placing any load. If not, note the zero error and apply the correction.
- Do not exceed the maximum rated load — this permanently deforms the spring and ruins the calibration.
How to Read a Measuring Cylinder
A measuring cylinder measures liquid volume. It is the one instrument in this list where the geometry of the liquid surface — the meniscus — determines the correct reading point.
For liquids that curve downward (concave meniscus — water, most aqueous solutions): Read from the bottom of the curved surface.
For liquids that curve upward (convex meniscus — mercury): Read from the top of the curved surface.
The reading must always be taken with the cylinder on a flat, level surface and the eye level with the meniscus — not from above, which makes the reading appear higher than it is and not from below, which makes it appear lower.
Least count: Typically 1 mL for a 100 mL cylinder, 0.5 mL for a 50 mL cylinder.

Summary: Reading Tips by Instrument
| Instrument | Key Reading Point | Most Common Mistake |
| Ruler | Eye directly above scale mark | Viewing from an angle; using worn end as zero |
| Vernier Caliper | Coinciding Vernier division + MSR | Reading at an angle; missing zero error |
| Screw Gauge | Sleeve + circular scale; use ratchet | Missing 0.5 mm graduation on sleeve |
| Thermometer | Top of column, eye level, in situ | Reading after removal from substance |
| Ammeter / Voltmeter | Pointer aligned with reflection | Wrong scale; no parallax correction |
| Spring Balance | Pointer at rest, vertical, eye level | Reading while oscillating; angle error |
| Measuring Cylinder | Bottom of meniscus (for water) | Eye not level with meniscus; tilted cylinder |
General Habits for Reliable Lab Readings
These are the habits that distinguish systematic, careful experimental work from sloppy data collection. None of them requires special equipment — only attention.
- Label every reading immediately. Note the instrument, the range, the unit and the reading together. Do not write down bare numbers without context.
- Be consistent with which side of an ambiguous mark you read. If a pointer falls exactly between two divisions every time, always round the same direction. Inconsistency introduces random error.
- Repeat the measurement by setting up fresh. Release the object, re-clamp it, re-zero the instrument and take the reading again. A repeated measurement with the instrument in exactly the same position is not a truly independent reading.
- Note environmental conditions. Temperature, humidity and vibration all affect precision instruments. Record these alongside your data.
- Identify and state your least count in lab reports. It is not an optional detail — it defines the precision of everything that follows.
[Learn more about Measurement Uncertainty in Physics: What It Is and Why It Always Exists]
[Learn more about How to Find Significant Figures: Rules, Examples & Common Mistakes]
Why This Skill Carries Beyond the Lab
Reading instruments correctly is not just a lab exam skill. It trains a deeper habit: understanding the difference between what an instrument reports and what you can actually trust. These are not always the same.
A reading taken carelessly, at an angle, without zero error correction, before stabilization — that reading has a number, but it does not have meaning. A reading taken correctly carries within its digits a precise claim about the physical world. Learning to make that claim responsibly is what experimental physics is about.
Every physicist, from a first-year student in a school lab to a researcher calibrating an interferometer, is doing the same fundamental thing: extracting trustworthy numbers from instruments, then building knowledge on top of those numbers. The precision of the knowledge is bounded by the care of the reading.
[Learn more about Accuracy vs Precision in Physics: Definition, Difference & Real-World Examples]
Conclusion
Reading a measuring instrument correctly is a set of learnable, concrete techniques. Eliminate parallax by positioning your eye properly. Check zero error before every session. Know the least count and report your reading accordingly. Use the ratchet on a screw gauge. Read a thermometer in situ. Look for the meniscus bottom in a measuring cylinder.
None of this is difficult. All of it makes a real difference. Develop these habits early — in Class 11 practicals, in competitive exam preparation, or whenever you first encounter experimental physics — and they will serve you across every level of science you encounter.
Frequently Asked Questions
What is parallax error and how do you avoid it?
Parallax error occurs when the observer’s line of sight is not perpendicular to the scale at the reading point, causing the scale to appear shifted. Avoid it by positioning your eye directly level with and perpendicular to the measurement point. For pointer instruments, use the mirror strip on the scale — align the pointer with its reflection before reading.
How do I know the least count of an instrument?
The least count is the value of the smallest division on the instrument’s scale. For a ruler graduated in mm, the least count is 1 mm. For instruments with auxiliary scales like the Vernier caliper, use the formula: LC = smallest main scale division ÷ number of Vernier divisions. For a screw gauge: LC = pitch ÷ number of circular scale divisions.
Why must a thermometer be read while still inside the liquid?
The moment a mercury thermometer is removed from a liquid, it begins equilibrating to the surrounding air temperature. The column shifts immediately, giving a reading that no longer represents the liquid’s temperature. Always read the scale while the bulb remains immersed.
What is zero error and how is it corrected?
Zero error exists when an instrument does not read zero when the measured quantity is zero. It is corrected by subtracting the zero error (with its sign) from the observed reading: Corrected Reading = Observed Reading − Zero Error. A positive zero error is subtracted; a negative zero error effectively adds to the reading.
How many significant figures should I record in a lab reading?
Record digits up to and including the least count digit, with one estimated digit beyond if the instrument allows it. For a ruler with 1 mm graduations, record to 1 mm as certain and estimate the 0.5 mm place. The number of significant figures in your reading should reflect what the instrument can actually resolve — no more, no less.
Why should I use the ratchet on a screw gauge instead of the thimble?
The ratchet stop limits the closing force to a consistent, standardized level. Tightening directly with the thimble applies variable pressure — different students and even the same student in different attempts will apply different forces, compressing soft objects and introducing variability. The ratchet removes this source of random and systematic error.
How do I read an ammeter with multiple scales?
First, identify which range terminal the red lead is connected to. This tells you which scale to read. Calculate the least count for that scale: LC = (range value) ÷ (number of divisions). Then read the pointer position on the correct scale only, using the mirror to eliminate parallax.
Leave a Comment